 Back
Back
1- HOW TO START A PROJECT:
There are several ways to create a Project.
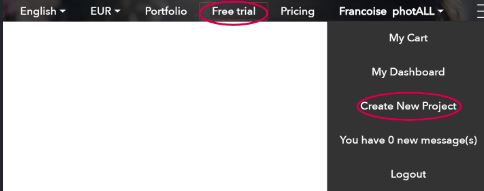
- By clicking on "Create new Project" after clicking on your name:
- By choosing "ORDERS & PROJECTS" on your Dashboard and click on "Create New
Project":

- Another way is from the service page by choosing the Service you need after clicking on
"Pricing" or on the hamburger menu on the top of the home page:

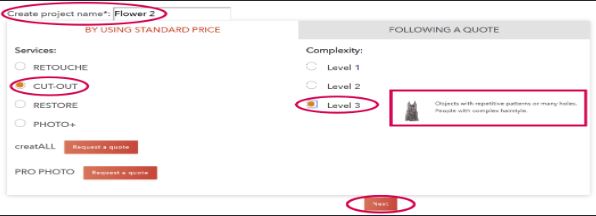
In this example, we will create a CUT-OUT Project.
For that, you have to choose the CUT-OUT Service and the Complexity level. We recommend to read information on the Service page to learn more about the level of Complexity.
Do not forget to name your project:
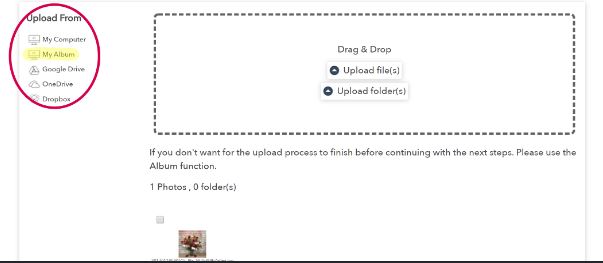
After clicking on "Next", upload your photos. We encourage you to use the function "ALBUMS".
You can upload your photos in your "ALBUMS" when you want, then, when you want to create a Project, you can select the photos you from your "My Album":
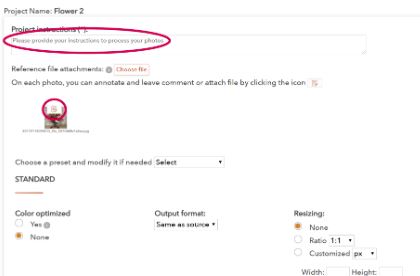
Then click on "Next" to enter a new page where you will find all the options you need. Do not forget to provide your instructions in the dedicated area.
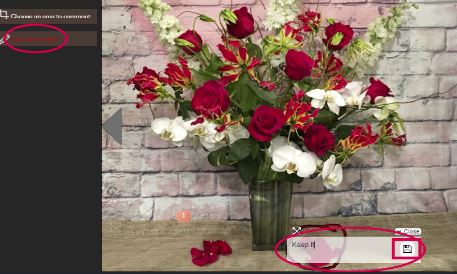
Also note that it is possible to provide special instructions for each photo by clicking on the small icon next to each one. Do not forget to save your comments after you finish:
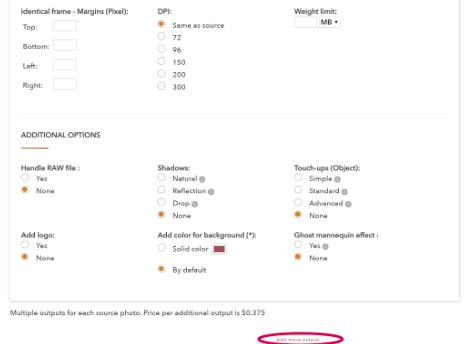
Chose all options needed, if you need several Output formats, click on "Add more output" on the bottom of the page:
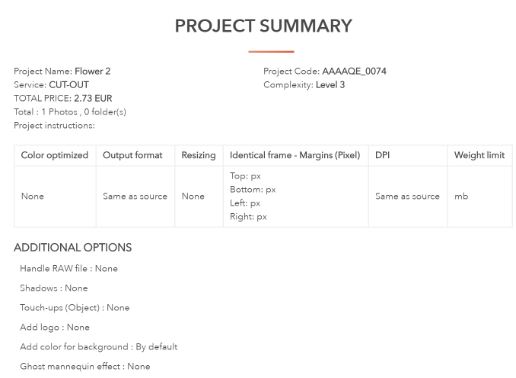
After clicking on "Next", you have access to your "Project summary". If you forgot something, click on "Back" and choose more options. Click on "Reset" if you want to cancel your project:
.JPG)
After clicking the last time on "Next", it is time to choose your payment method. We encourage you to use your Account. By crediting it you benefit from a discount and it is also possible for you to pay small amounts. If you have a Coupon, do not forget to enter its code at this stage:

2- WHEN THE PROJECT IS DONE:
When your Project is done, you will receive an email with a link to check the Output. It is also possible to go to "ORDERS & PROJECTS" in your Dashboard and click on "Detail" on the right of your Project.

From this page, download your project or each photo 1 by 1.
It is also possible to ask for revision and to "Get a share link" to share your photos with your family, your friends or your clients. Do not forget to "Approve & close project" once you are satisfied:

*Note that the person receiving the link can preview the Output only. To download it, the Guest must create a free photALL account.
If the result doesn't fit your expectations, it's possible to request for a revision within 5 days after the delivery: How to request a revision
READ OUR OTHER RECENT ANSWERS
-
How long do you keep my photos?
Once the Project is closed, the final photos are kept in ORDERS & PROJECTS for 30 days. You will
-
What is the difference between a Project and an Order?
An Order can contain more than one Project. A Project contains all photos having the same
-
How to start a Project?
-
How to cancel a Project?
As long as your Project status is being created, you can cancel it by clicking on
-
What is a Project?
A Project is a collection of photos with 1 or several related photos. A Project holds photos to
-
How to modify a submitted Project?
In such case, please contact us, we will decide together what is possible to do.
-
How to give instructions per photos?
For each Project, you can write your instructions in the dedicated space.
-
How to request a revision
It may happen that following a misunderstanding or an oversight on our part, you are not entirely
-
How to create a RETOUCHE Project
1- HOW TO START YOUR PROJECT:

